Friday, August 5, 2016

Reasons You Become Unattractive And You’re Not Aware of It

Everyone strives to be a great person, kind, caring, and compassionate. But for some people, that’s not always the case. There are many behaviors or ‘bad habits’ that people have that make them seem unattractive, annoying, or someone that no one wants to be around with. A few of these harmful characteristics are offered for you below, and if you happen to realize that you embody any of them – quit! You might find your circle of friends grow once you do.

1. You are Self-Absorbed

Many people do this without realizing it. You focus solely on yourself, talk only about yourself, and often don’t care what others around you have to say. You think you’re the only one that matters. If this is you, it’s time to change. No one wants to be friend with someone who only cares about themselves.

2. You Focus on Outer Beauty, Ignoring What’s Inside

Surprisingly, true beauty comes from within your heart, body, and soul. Your physical appearance isn’t something that matters the most, but people with unattractive behaviors think that outer beauty is all that matters. Take a look in the mirror – deep within yourself – and you might see what lies beneath. An ugly person. Unless you change your way of thinking.


3. You are Always in Competition

Are you the person who has to be better than everyone else, see more, do more? If so, you’re an unattractive person. You should care more about your friends, and let them have their moment. If they overcame their fear of heights and climbed 10 feet in the air, don’t say, “That’s all? I’ve climbed 30 feet!” Instead say, “Wow! That’s awesome. I’m really proud of you.”


4. You View Your Friends as Enemies

People who are seen as unattractive are often in fights with their friends. Instead of banning together and truly being able to care for others, you’re always turning your back, and stabbing them in theirs. Your friends are not your enemies. They are your allies.


5.You Question Your Importance to Others

You are definitely an unattractive person when you constantly question why others don’t see you as important as you think they should. For instance, your two friends went somewhere without you – it doesn’t matter to them – but to you it does. Get over it. They’re still your friend, and their lives don’t stop when you’re not around.

6. You are the Boss

In a group of friends, everyone should be on an equal playing field. If you’re the one always making decisions, constantly needing to be in charge, or trying to control what others are doing, you’re acting in an unattractive way.


7. You are Dishonest

When it comes to being a great friend, or someone whom others want to be around, you need to be honest. Many people who partake in ugly behaviors are often dishonest, lying about everything, inquiring about every question asked about them, and how they truly feel about different things. Yes, honesty is the best policy.

8. You are Rude

If you’re the person that’s frequently impolite, offensive, or embarrassing your friends with your rude comments in public – quit. You’re not someone people would want to be around. There are going to be times when you don’t agree with someone, or see something you didn’t want to see, but there’s no point in making a scene, because you’re making everyone look at your terrible behavior and they’re not seeing what you’re seeing.


9. You are Unreliable, Yet Dependent Upon Others

Are you there when your friends call for help? Or are you always busy when someone needs you? If you’re the person no one can count on, that’s an unattractive quality in friendships. Similarly, if you’re the one always calling for help from others, yet never offering yours when they need it, that’s another unattractive quality that no one wants in a friend.


10. You are Always Negative

Pessimism is not an attractive quality. If you’re constantly putting things down, or seeing situations in a negative light, try and change your attitude. Nobody wants to be friends with someone who’s constantly seeing the negative instead of the positive.

Monday, August 1, 2016

How to Burn a Program into Arduino Board

Burn Blinking LED

In this lesson, you will learn how program your Arduino to make the Arduino's built-in LED

blink.
The Arduino has rows of connectors along both sides that are used to connect to electronic devices and plug-in 'shields' that allow the Arduino to do more.

However, the Arduino also has a single LED that you can control from your sketches. This LED is built onto the Arduino board and is often referred to as the 'L' LED as this is how it is labelled on the board.

The position of this LED is circled in red on the pictures of the Arduino Uno below.


The Arduino IDE includes a large collection of example sketches that you can load up and use. This includes an example sketch for making the 'L' LED blink.

Load the 'Blink' sketch that you will find in the IDE's menu system under File>Examples>01.Basics


When the sketch window opens, enlarge it so that you can see the whole of the sketch in the window.


Saving a Copy of 'Blink'
The example sketches included with the Arduino IDE are 'read only'. That is, you can upload them to an Arduino board, but if you change
them, you cannot save them as the same file.

We are going to change this sketch, so, the first thing you need to do is save your own copy that you can change however you like.

From the File menu on the Arduino IDE select the option 'Save As..' and then save the sketch with the name 'MyBlink'.


You have saved your copy of 'Blink' in your sketchbook. This means that if you ever want to find it again, you can just open it using the File>Sketchbook menu option.


Uploading Blink to the Board
Attach your Arduino board to your computer with the USB cable and check that the 'Board Type' and 'Serial Port' are set correctly. 

The Arduino IDE will show you the current settings for board at the bottom of the window.

Click on the 'Upload' button. The second button from the left on the toolbar. 

If you watch the status area of the IDE, you will see a progress bar and a series of messages. At first it will say 'Compiling Sketch..'. This converts the sketch into a format suitable for uploading to the board.


Next, the status will change to 'Uploading'. At this point, the LEDs on the Arduino should start to flicker as the sketch is transferred.


Finally, the staus will change to 'Done'.


The other message tells us that the sketch is using 1,084 bytes of the 32,256 bytes available.After the 'Compiling Sketch..' stage you could get the following error message:


The clue is at the top here, it probably means that your board is not connected at all, or the drivers have not been installed (if necessary) or that the wrong serial port is selected.

If you get this, check if the board is connected and that you selected the right board and port.

Once the upload has completed, the built-in LED must start blinking.

Basic Structure of Arduino Programming Language


The basic structure of the Arduino Programming Language is fairly simple and runs in atleast two parts. These two required parts or functions enclose blocks of statement.


setup()
The setup() function is called when a sketch starts. Use it to initialize variables, pin modes, start using libraries, etc. The setup function will only run once, after each power up or reset of the Arduino board.


loop()After creating a setup() function, which initializes and sets the initial values, the loop() function does precisely what its name suggests, and loops consecutively, allowing your program to change and respond. Use it to actively control the Arduino board.

Both functions are required for the program to work.


Tuesday, July 26, 2016

Getting Started in the Arduino Software (IDE)

Writing Sketches
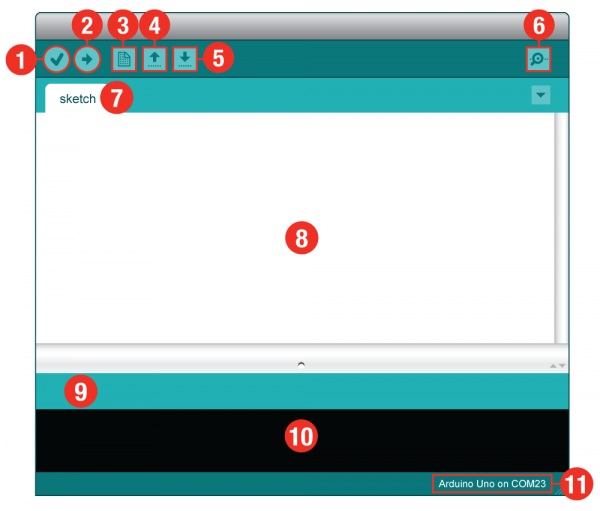
Programs written using Arduino Software (IDE) are called sketchesThese sketches are written in the text editor and are saved with the file extension .ino. The editor has features for cutting/pasting and for searching/replacing text. The message area gives feedback while saving and exporting and also displays errors. The console displays text output by the Arduino Software (IDE), including complete error messages and other information. The bottom right-hand corner of the window displays the configured board and serial port. The toolbar buttons allow you to verify and upload programs, create, open, and save sketches, and open the serial monitor. 

Note: Versions of the Arduino Software (IDE) prior to 1.0 saved sketches with the extension .pde. It is possible to open these files with version 1.0, you will be prompted to save the sketch with the .ino extension on save. 

Now, it’s finally time to open up the Arduino software. You’ll be presented with a window that looks something like this:
Arduino IDE annotated
  1. Verify: Compiles and approves your code. It will catch errors in syntax (like missing semicolons or parenthesis).
  2. Upload: Sends your code to the Arduino  board.
  3. New: This buttons opens up a new code window tab.
  4. Open: This button will let you open up an existing sketch.
  5. Save: This saves the currently active sketch.
  6. Serial Monitor: This will open a window that displays any serial information your Arduino board is transmitting. It is very useful for debugging.
  7. Sketch Name: This shows the name of the sketch you are currently working on.
  8. Code Area: This is the area where you compose the code for your sketch.
  9. Message Area: This is where the IDE tells you if there were any errors in your code.
  10. Text Console: The text console shows complete error messages. When debugging, the text console is very useful.
  11. Board and Serial Port: Shows you what board and the serial port selections.

MENU


File
NewCreates a new instance of the editor, with the bare minimum structure of a sketch already in place.
OpenAllows to load a sketch file browsing through the computer drives and folders.
Open RecentProvides a short list of the most recent sketches, ready to be opened.
SketchbookShows the current sketches within the sketchbook folder structure; clicking on any name opens the corresponding sketch in a new editor instance.
ExamplesAny example provided by the Arduino Software (IDE) or library shows up in this menu item. All the examples are structured in a tree that allows easy access by topic or library.
CloseCloses the instance of the Arduino Software from which it is clicked.
SaveSaves the sketch with the current name. If the file hasn't been named before, a name will be provided in a "Save as.." window.
Save as...Allows to save the current sketch with a different name.
Page SetupIt shows the Page Setup window for printing.
PrintSends the current sketch to the printer according to the settings defined in Page Setup.
PreferencesOpens the Preferences window where some settings of the IDE may be customized, as the language of the IDE interface.
QuitCloses all IDE windows. The same sketches open when Quit was chosen will be automatically reopened the next time you start the IDE.

Edit

Undo/RedoGoes back of one or more steps you did while editing; when you go back, you may go forward with Redo.
CutRemoves the selected text from the editor and places it into the clipboard.
CopyDuplicates the selected text in the editor and places it into the clipboard.
Copy for ForumCopies the code of your sketch to the clipboard in a form suitable for posting to the forum, complete with syntax coloring.
Copy as HTMLCopies the code of your sketch to the clipboard as HTML, suitable for embedding in web pages.
PastePuts the contents of the clipboard at the cursor position, in the editor.
Select AllSelects and highlights the whole content of the editor.
Comment/UncommentPuts or removes the // comment marker at the beginning of each selected line.
Increase/Decrease IndentAdds or subtracts a space at the beginning of each selected line, moving the text one
space on the right or eliminating a space at the beginning.
Find Opens the Find and Replace window where you can specify text to search inside the current sketch according to several options.
Find NextHighlights the next occurrence - if any - of the string specified as the search item in the Find window, relative to the cursor position.
Find PreviousHighlights the previous occurrence - if any - of the string specified as the search item in the Find window relative to the cursor position.

Sketch
Verify/Compile - Checks your sketch for errors compiling it; it will report memory usage for code and variables in the console area.
Upload Compiles and loads the binary file onto the configured board through the configured Port
Upload Using Programmer This will overwrite the bootloader on the board; you will need to use Tools > Burn Bootloader to restore it and be able to Upload to USB serial port again. However,     it allows you to use the full capacity of the Flash memory for your sketch. Please note that this command will NOT burn the fuses. To do so a Tools -> Burn Bootloader command must be             executed.
Export Compiled BinarySaves a .hex file that may be kept as archive or sent to the board using          other tools.
Show Sketch FolderOpens the current sketch folder.
Include LibraryAdds a library to your sketch by inserting #include statements at the start of your code. For more details, see libraries below. Additionally, from this menu item you can access the Library Manager and import new libraries from .zip files.
Add File... Adds a source file to the sketch (it will be copied from its current location). The new file appears in a new tab in the sketch window. Files can be removed from the sketch using the tab menu accessible clicking on the small triangle icon below the serial monitor one on the right side o the toolbar.

Tools
Auto FormatThis formats your code nicely: i.e. indents it so that opening and closing curly braces line up, and that the statements inside curly braces are indented more.
Archive SketchArchives a copy of the current sketch in .zip format. The archive is placed in the   same directory as the sketch.
Fix Encoding & ReloadFixes possible discrepancies between the editor char map encoding and other operating systems char maps.
Serial MonitorOpens the serial monitor window and initiates the exchange of data with any connected board on the currently selected Port. This usually resets the board, if the boar supports Reset over serial port opening.
BoardSelect the board that you're using. See below for descriptions of the various boards .
Port This menu contains all the serial devices (real or virtual) on your machine. It should automatically refresh every time you open the top-level tools menu.
ProgrammerFor selecting a harware programmer when programming a board or chip and not using the onboard USB-serial connection. Normally you won't need this, but if you're burning a bootloader to a new microcontroller, you will use this.
Burn BootloaderThe items in this menu allow you to burn a bootloader onto the microcontroller on an Arduino board. This is not required for normal use of an Arduino or Genuino board but is useful if you purchase a new ATmega microcontroller (which normally comewithout a bootloader). Ensure that you've selected the correct board from the Boards menu before burning the bootloader on the target board. This command also set the right fuses.

Help
Here you find easy access to a number of documents that come with the Arduino Software (IDE). You have access to Getting Started, Reference, this guide to the IDE and other documents locally, without an internet connection. The documents are a local copy of the online ones and may link back to our online website.

Find in Reference
This is the only interactive function of the Help menu: it directly selects the relevant
page in the local copy of the Reference for the function or command under the cursor.